Chevron Tutorial Video
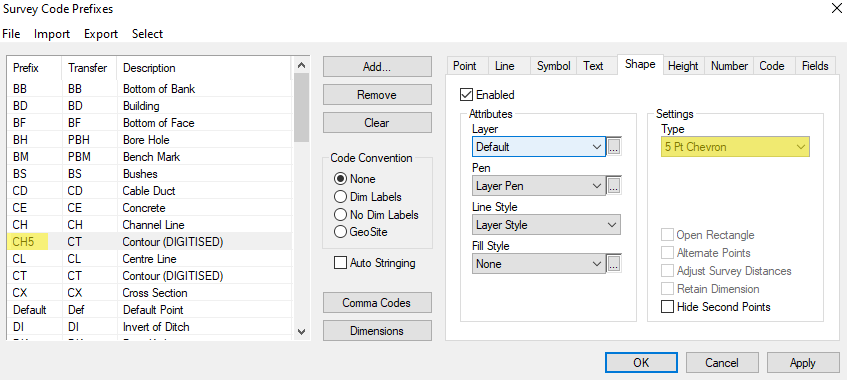
4pt and 5pt Chevron shapes have been added to the shape types in the Code table. They are available to be used on-site via normal survey methods, or in the Point Cloud engine for digitising purposes. 4pt assumes the chevron is symmetrical, the 5pt allows each trailing edge to be individually tailored to fit the exact chevron being recorded.
5pt Chevron
|
4pt Chevron
|
More information on how to digitise can be found here.
Using 5pt Chevrons
When using any shape we need to assign it to a specific code. To do this open the code table > Add or click a current code > select shapes and ensure 5pt Chevron has been chosen.

Following this open the 3D viewer and select Digitise.

New: Adds the Comma N to the code so a new string is created. (This is not necessary when transitioning between any shape).
Code: Here is where you need to use the code we previously set up with the 5pt chevron.
Select Points: Activates the tool to start digitising.
We can now select the Chevrons from within the Point Cloud following the same pattern as shown in the 5pt Chevron image above. Once all of the Chevrons have been digitised we can now digitise the Road Markings as this will allow us to use the align parallel tool to make the edges of the Chevrons an equal distance.

Aligning the Edges of a Chevron
Close the 3D viewer and zoom to extents. Now add the Chevron edge points to the list so we can align them to the Road Markings. Note: If the Road Marking is not one continuous string then you will need to do each side of the Chevrons separately.


Now we will align the Chevrons to the Road Markings, ensure the pick mode is set to List and press Design --> Align --> Parallel. As the Tool is now active we need to select the Road Marking followed by one point we would like to use as the distance. Note: As the pick mode was set to List only the listed points will be affected.
Aligning the Middle of a Chevron
We can now align the middle of the Chevrons using the Design > Align > Points. However, we first need to add these points to the List which can be done quickly by inverting the currently listed and then remove the Road Marking string.
Note: More information on Lists can be found here.


Finally select Design --> Align --> Points. We now need to select two middle Chevron points which the rest will be aligned too. This might be the first two or the first and last.


Comments
0 comments
Please sign in to leave a comment.